
Quick Start
In just a few minutes we'll build your first PWA - from an empty list to a working app on your own domain. The steps go in order: each one builds on the previous, so just move from top to bottom.
What's already set up
The Cloudflare and traffic filter accounts are connected in advance and are filled in automatically when you create a PWA. You don't need to configure anything before you start - go straight to the steps.
Step 1. Open the PWA list
In the sidebar menu on the left, select PWA. This is your working showcase of all apps.
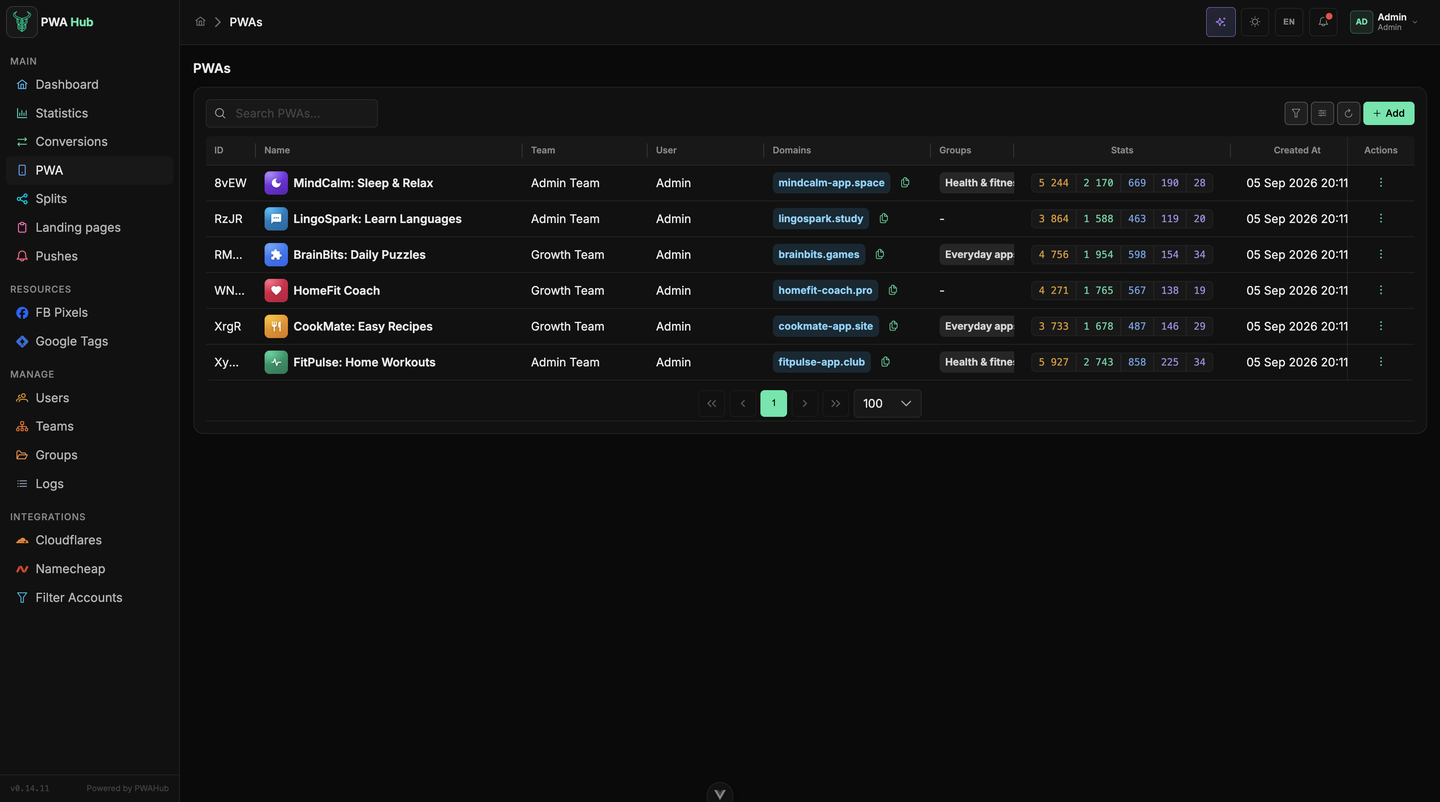
From here it's convenient to manage everything:
- the All / Active / Inactive toggles at the top quickly filter the apps you need, and there's a search by name next to them;
- the Status column shows what's running (running) and what's stopped (stopped) - and right here you can turn an app on or off without opening it;
- the Stats column folds the app's funnel into five numbers (uniques, installs, regs, deps, repeats), and the Archived filter in the popover shows the apps you've set aside.
If you haven't created anything yet, the list is empty and you'll see "No PWAs found" - that's normal, we'll fix it now.
Step 2. Create an application
Above the table, on the right, click + Add - the new PWA form will open. At the start, only the General tab is active: the rest will open after the first save, so that's exactly where we begin.
Step 3. Fill in the "General" tab
This is where the foundation of the app is set. To launch, literally just a few fields are enough.
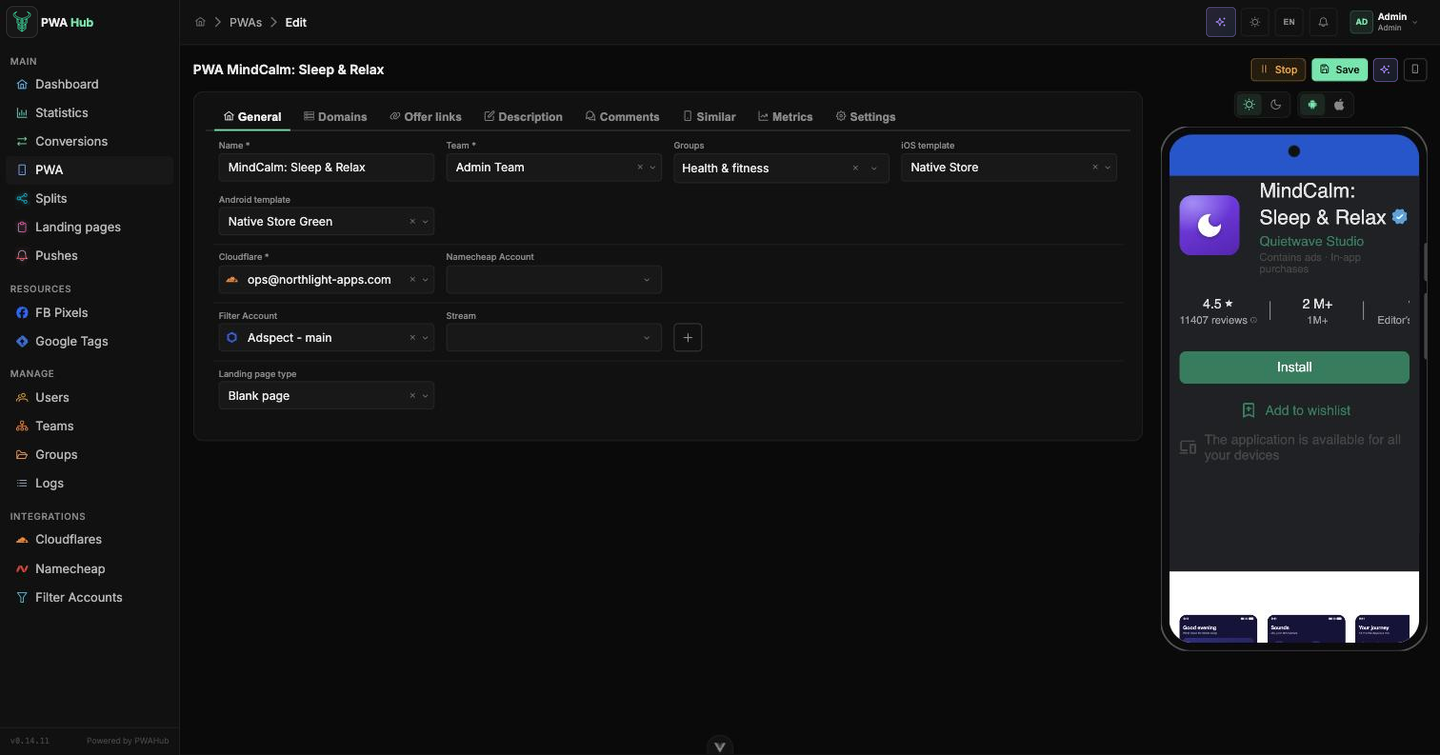
- Name - how the app is labeled in your panel. It's only for you; users don't see it, so name it in a way that's easy to find in the list.
- iOS template and Android template - how the install page looks on each platform: Native Store for iPhone, Native Store Green or Web Store for Android. You can change this choice later, too.
Below, under the divider, are the service accounts Cloudflare (the domain works through it) and Filter Account (it separates live traffic from checks). Both are already filled in with your main accounts and chosen from a ready-made list - usually you can leave them as they are.
White page
The Landing page type field decides what to show instead of the storefront when traffic is recognized as a check - the so-called "white page." Your choice determines whether an additional field appears next to it:
- Landing page redirect URL - traffic goes to an external address (you need to specify the link in the Landing page URL field);
- Load Landing page - a landing page prepared in advance is shown from the list;
- Off Landing page / Blank page - no white page is used.
If you're unsure, leave Blank page: it doesn't affect the launch, and you can come back to this setting at any time.
Step 4. Save the application
In the form header, click Create. The app will be saved, you'll enter edit mode, and everything else opens up:
- the header button changes to Save - now you use it to commit any edits;
- the rest of the tabs become available: Domains, Offer links, Description, Comments, Similar, Metrics, and Settings;
- the Start button and a mobile preview (the phone icon in the corner) appear.
If saving fails
The form will switch itself to the tab with the first error and highlight the problematic field - most often it's something on the General tab. Fix what's highlighted and click Create again.
Step 5. Add a domain
Go to the Domains tab - these are the addresses at which the app will open. Click Add new Domain.
The simplest path for the first launch is to leave the System type and pick a domain from the shared pool. If you want your own address, switch to My domain, or to register a new domain right from the panel through Namecheap, choose Buy new; if you like, you can specify a Subdomain. Click Save - the domain will appear in the table, and the open button next to it lets you open the site right away and make sure it responds.
You can add several domains
All added domains lead to the same app. One is enough for the first launch, and you can expand later.
Step 6. Set up the storefront
The storefront is what the user sees: name, icon, screenshots, description. It's configured on the Description tab. For the first launch, the minimum is enough:
- Title - what the app is called in the store;
- Main icon - the icon image;
- Screenshots - a couple of images for the carousel.
Don't forget to save the images
The icon and screenshots first go into the preview and are only sent to the server when you click Save. Once you've uploaded the images, save the form right away.
Fine-tuning the storefront - categories, buttons, rating, reviews, the similar apps block - can be left for later; the details are collected in the "Storefront and Content" section.
Step 7. Launch the PWA
Once the domain is added and the storefront is set up, click Start in the form header.
The status will switch to running, and the button will change to Stop - so you can turn the app off at any moment. In the PWA section list, the app will light up with a green status, and you can turn it on and off right from there.
Done - your first PWA is created and is accepting traffic on your domain. Visits and installs will start appearing on the Dashboard and in the PWA list.
What's next
When you have several apps, the Splits and Landing pages sections in the sidebar menu will help you distribute traffic among them. And for detailed appearance settings, take a look at the "Storefront and Content" section.