
Installation
This page walks you through deploying PWA Hub on your own server - from a clean machine to a working dashboard. The installer handles all the routine work: it installs everything you need, creates a service user, lays out the files, generates passwords, and starts the system. You'll need your license key - the installer asks for it first. After that, open up access through Cloudflare and set the panel domain on first login.
The panel domain is set when you activate the license
Right after installation the panel opens by the server's IP. The domain it will live on from then on is set on the license screen - any host whose DNS points to your server through Cloudflare: a subdomain of your domain (for example admin.<your-domain>) or a separate domain. After activation the panel answers only on that domain, and the IP entry closes. Prepare the DNS record for it in advance (see step 1 below and the "Domains and Cloudflare" section).
The whole process takes a few minutes. Below are step-by-step instructions with ready-made commands: just copy and paste.
One-command install
Connect to the server over SSH and run:
curl -fsSL https://install.pwahub.org/bootstrap.sh | sudo bashFirst, the installer asks for your license key:
License key (XXXX-XXXX-XXXX-XXXX), then press Enter:
>
Paste the key and press Enter. The key is checked right away: if it's wrong or the license is not active, the installation stops with a hint - nothing on the server has changed yet. Then the script checks the server and deploys everything you need. You can follow the installation progress right in the terminal - each step is marked with a green checkmark.
Installing without prompts
You can pass the key right in the command - handy for scripts and reinstalls:
curl -fsSL https://install.pwahub.org/bootstrap.sh | sudo bash -s -- --license XXXX-XXXX-XXXX-XXXXRunning it again on a server that is already installed accepts the same key - your data and passwords are kept. Another key is accepted only if the previous license is no longer active; a working license is changed in the panel, see the "License" section.
Server requirements
Before installing, make sure your server is a fit: a clean VPS on Ubuntu 20.04+ or Debian 12-13, 2+ vCPUs, 4 GB RAM, and 20 GB of disk, root access, and free ports 80 and 443. The installer checks everything at the very beginning and stops if something is off. The full checklist is in the "Requirements and Preparation" section.
A clean server is the best start
Deploy PWA Hub on a fresh machine where nothing is yet listening on ports 80 and 443. That way the installer runs without conflicts, and the system comes up correctly right away.
What the installer does
In short: the installer checks the server, installs everything needed, creates the service user pwa and lays out the files in /opt/pwa, generates .env with passwords and a self-signed SSL certificate for the Cloudflare Full mode, then starts the system and shows a summary with the Dashboard address.
All output is also duplicated to a log file, so nothing gets lost even if you closed the terminal:
cat /var/log/pwa-bootstrap.logWhere to find the passwords
At the very end, the installer will show a Generated Configuration block - the system address and the admin password. It looks roughly like this:
Generated Configuration:
APP_URL: http://203.0.113.10
Admin Password: xxxxxxxxxxxxxxxx

! IMPORTANT: Save the admin password!
All service credentials are stored in: /opt/pwa/.env
Didn't manage to copy it in time? No problem - the same values can always be found in two places:
cat /var/log/pwa-bootstrap.log
cat /opt/pwa/.env
ADMIN_PASSWORD is the password of the first administrator with the email [email protected], the one you'll use to log in to the Dashboard. Save it right away.
Store the password securely
The admin password is generated once during installation. Copy it into a password manager or another safe place - it can only be recovered from .env on the server itself, and you're unlikely to peek in there every day after setup.
Post-installation steps
The installer deploys the system and starts it automatically - once installation finishes, the stack is already running. One step remains: open up access through Cloudflare. You'll set your domain and license right in the Dashboard at first login - no need to edit files on the server.
Prepare a domain for the panel
Decide which address the panel will open at: usually a subdomain of your domain such as admin.<your-domain>, but any other host works too, up to a separate domain. There are two limits: the host must be served through Cloudflare and must not coincide with any PWA domain.
In Cloudflare add a proxied A record for that host pointing to your server's IP (the one you installed PWA Hub on - the installer shows it in the Generated Configuration block). The record fields and the step-by-step order are in the "Domains and Cloudflare" section.
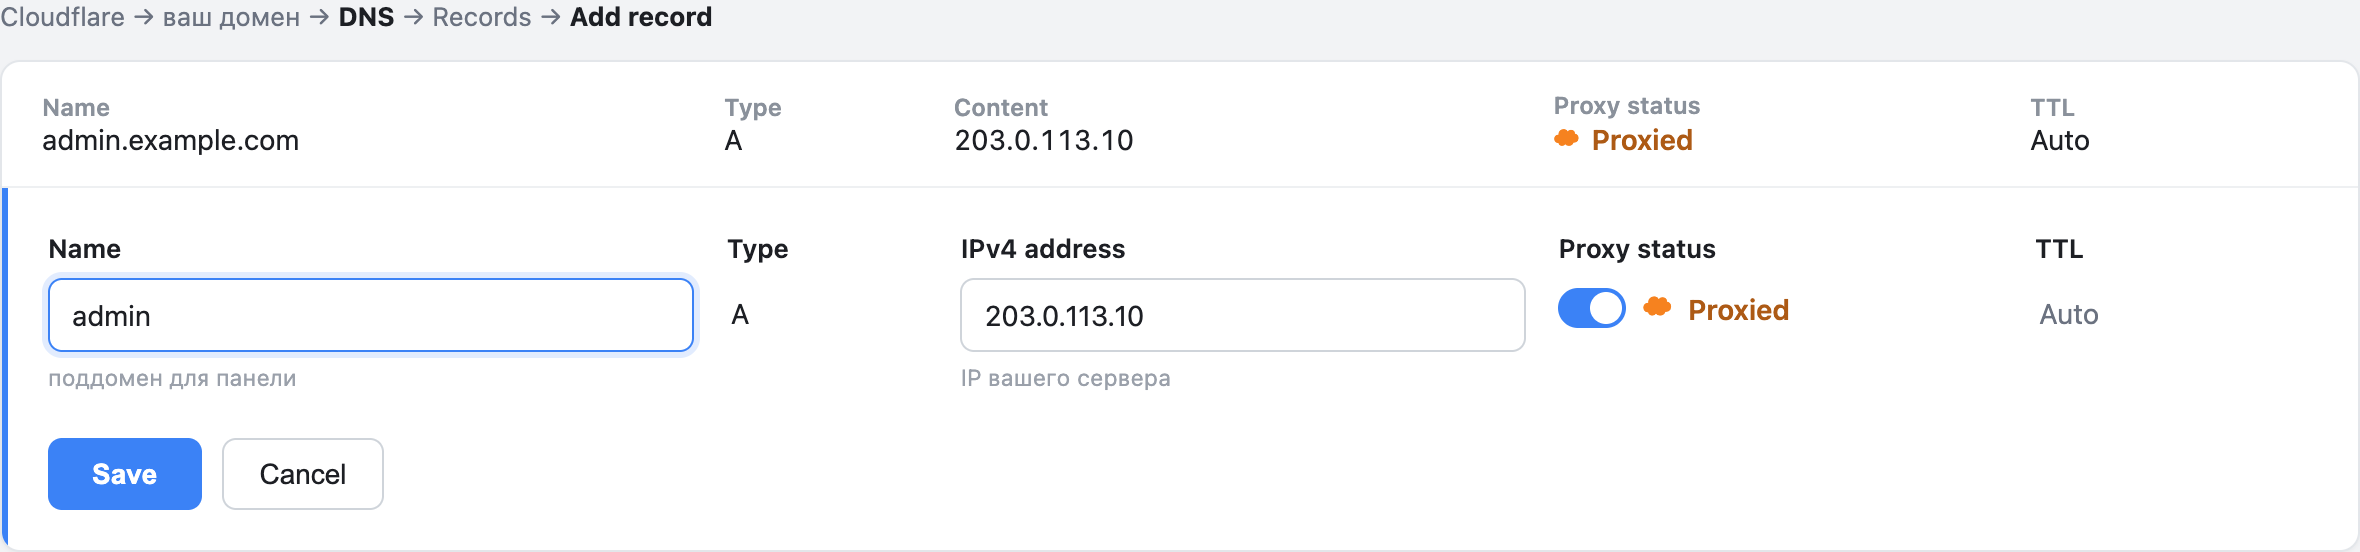
The record is needed by the time you activate the license
The first sign-in happens by IP, so you won't get stuck without the record. But the domain you enter on the license screen must already resolve to the server - otherwise, after activation the panel won't open either by domain or by IP. Cloudflare records usually apply within a minute. DNS for your PWA domains is created by the system later on its own.
First login
Open the panel in the browser by the server's IP - https://<server-ip>/ (the address is shown in the Generated Configuration block).
Confirm the connection
Until the panel has a domain, it runs on the IP with a self-signed certificate, and the browser warns that the connection is not private. That's normal for the first sign-in - confirm and proceed:
- Chrome: on the "Your connection is not private" page (
NET::ERR_CERT_AUTHORITY_INVALID) click Advanced, then the Proceed to <IP> (unsafe) link. - Safari: click Show Details, then visit this website and confirm.
- Firefox: click Advanced…, then Accept the Risk and Continue.
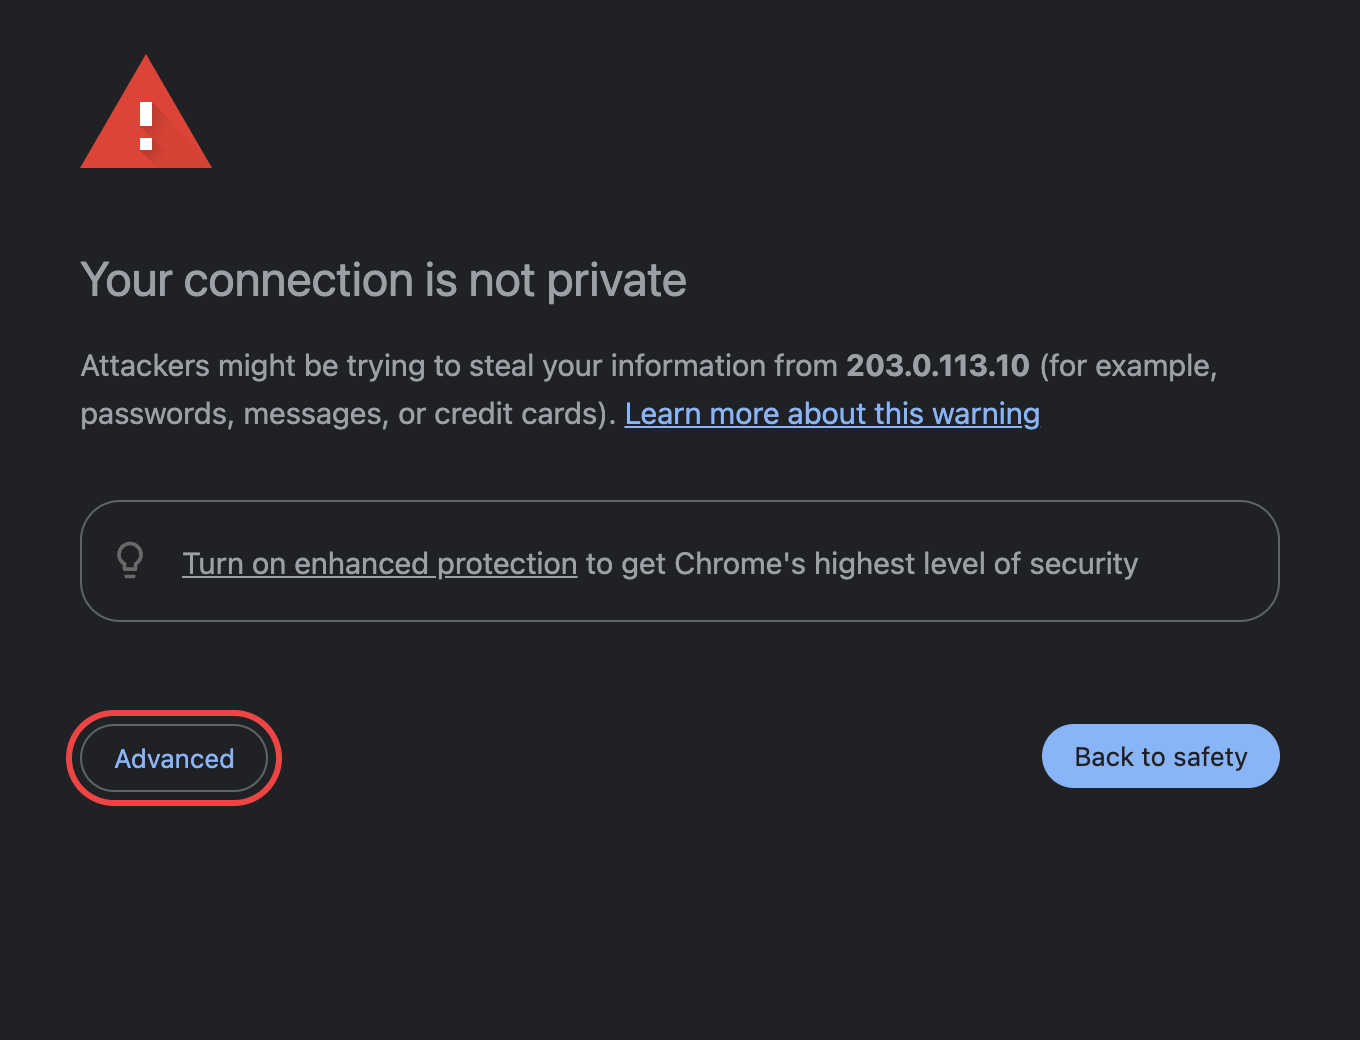
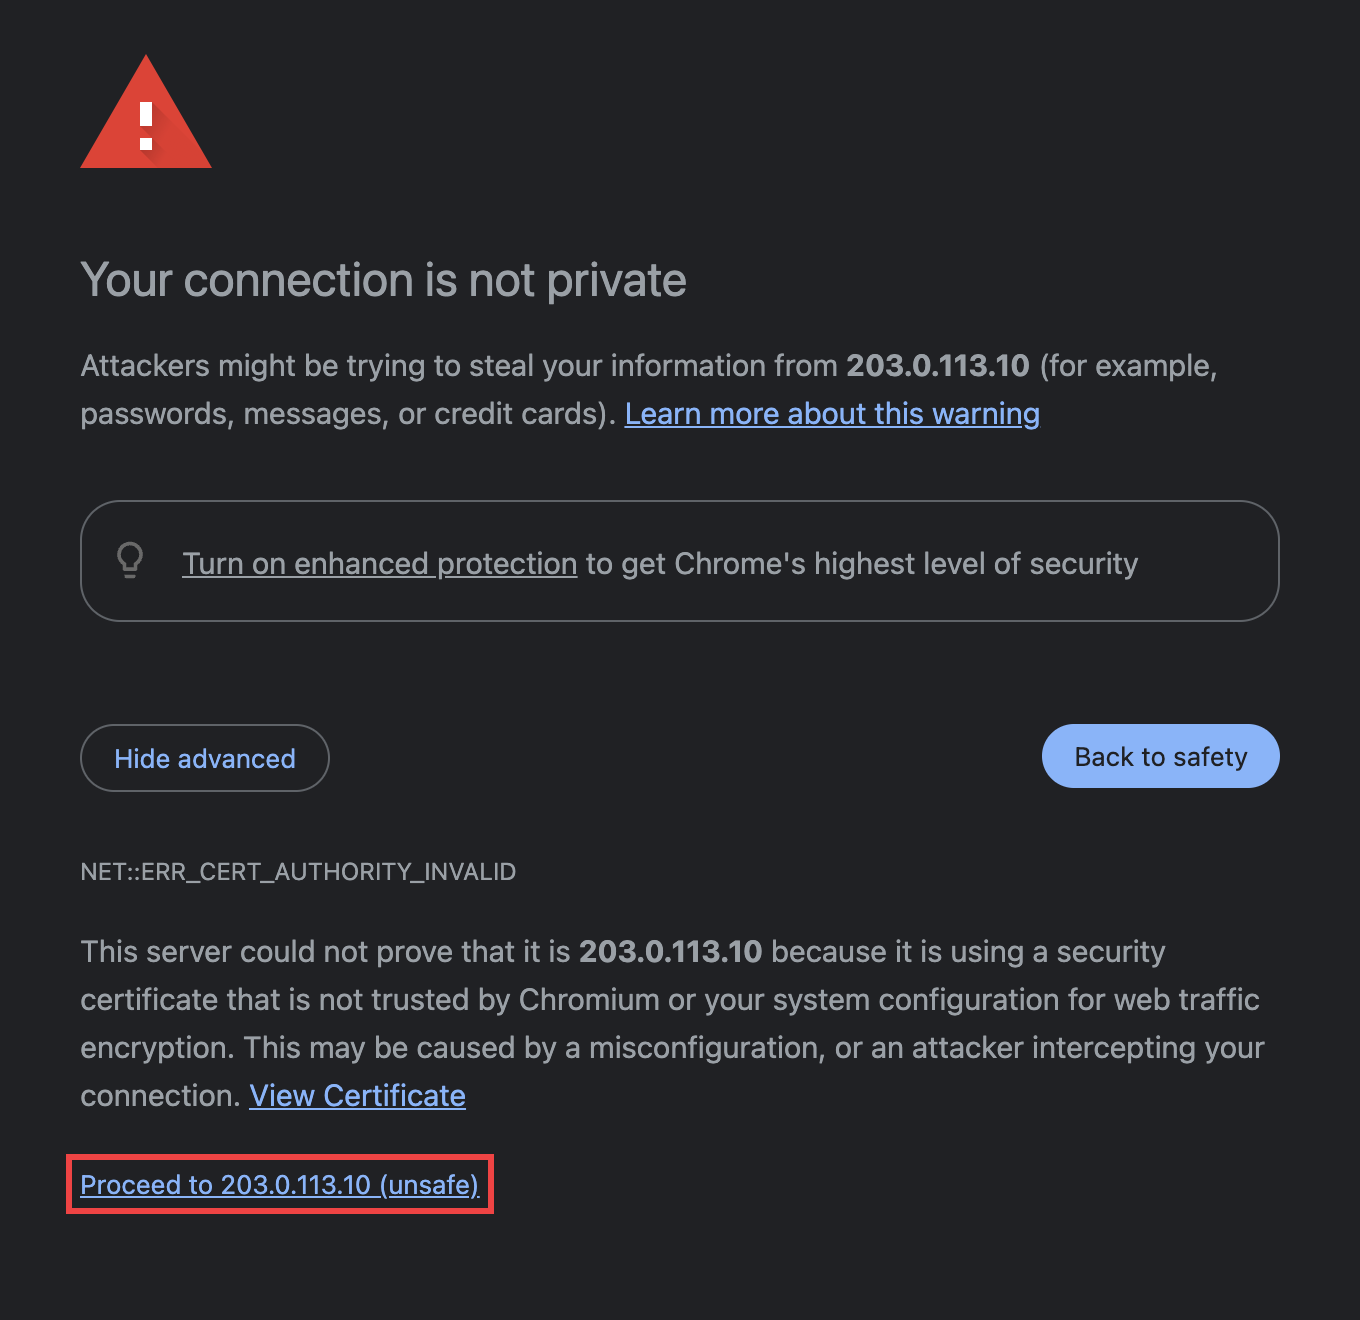
The warning goes away once the panel moves to its domain: there the connection is protected by Cloudflare.
Sign in as the first administrator:
- Email:
[email protected] - Password: the
ADMIN_PASSWORDvalue from the Generated Configuration block.
After signing in you land on the license screen: the key from the installation is already filled in - enter the panel domain in the Panel domain line and click Update License (details in the "License" section). The panel moves to that domain and the IP entry closes - from then on open it by the domain only.
The panel won't open by the domain?
It's almost always the DNS record of that host in Cloudflare (see above). Check that the record exists, points to your server's IP and is proxied (orange cloud). Records apply within a minute or two. A 403 when opening by IP after activation is not an error: the IP entry is closed on purpose.
Change the password right away
ADMIN_PASSWORD was generated automatically and is known to everyone who saw the installation log. After your first login, open your profile page (the menu in the top-right corner → Profile) and set your own password in the Change password card - that way the Dashboard will be fully under your control.
Activate the license
At first login, while the license is not yet activated, the license screen opens. The key you entered during installation is already in the field - set your domain and update the license, and the Dashboard unlocks. The domain is bound to the license and applied immediately, with no .env edits and no restart. What this screen looks like is covered in the "Signing In" section, and activation in more detail in the "License" section.
Updating
Keeping PWA Hub up to date is simple - everything is done right from the dashboard, without SSH. How to update the system and maintain the server is described in the "Server maintenance" section.