
Push notifications
A push is a short message that lands on someone's phone from your installed app. It shows up on the screen even when the app is closed, and tapping it opens the page you choose - usually your offer.
This is the one channel that brings a user back for free: you already paid for the install, and from then on you can remind them as often as you like. The typical setup is "set it and forget it": a welcome message a couple of hours after the install, a reminder in the evening, and a separate offer for those who signed up but never funded their account.
Open this section from the Pushes menu.
How it works
The chain is simple, and you only take part in two of its links:
- Subscription. Someone installs your PWA and allows notifications. The browser hands the app a "delivery address", and it is stored in the system. This happens on its own - all you do is enable subscription collection in the PWA settings.
- Segment. Every subscriber carries a country, a language and a position in the funnel: installed, registered, deposited. The status is raised automatically when a postback arrives from the affiliate program.
- Push. You create it in this section: write the copy, choose who gets it and when.
- Delivery. The system sends the messages itself - manually on a button, on a schedule, or a set time after an event. Sends and clicks land in the push's stats.
Permission is asked once
The browser shows the notification prompt once, and a refusal is permanent: there is no asking again. That is why the PWA settings offer an "ask in-app first" mode - more on that below.
Step 1. Enable subscription collection in the PWA
Pushes only reach people who subscribed, and the subscriptions are collected by the app itself. Open the PWA you need and go to the Settings tab - the Push notifications block is there.
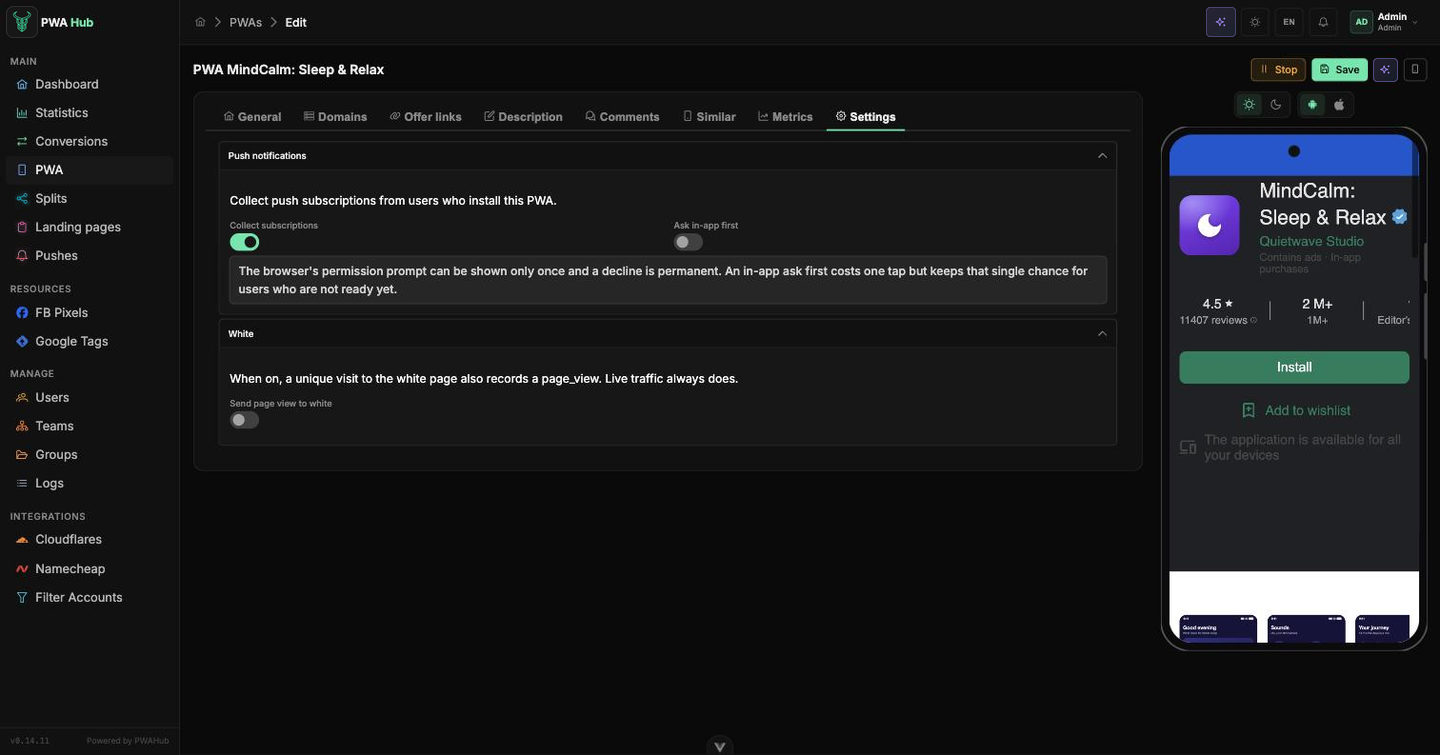
- Collect subscriptions - turns collection on. While the toggle is off, the app asks nothing and the subscriber base does not grow.
- Ask in-app first - shows your own screen offering to enable notifications first, and only calls the browser's prompt after they agree.
Why ask twice
The browser's prompt is a one-shot: tap "Block" and there will never be a subscription from that person. Your own screen costs one extra tap, but those who are not ready right now simply close it - and the browser prompt stays unspent for the next time.
Everything after that runs without you: a person installs the app, allows notifications and joins the subscriber base with their country, language and the installed status.
Pushes list
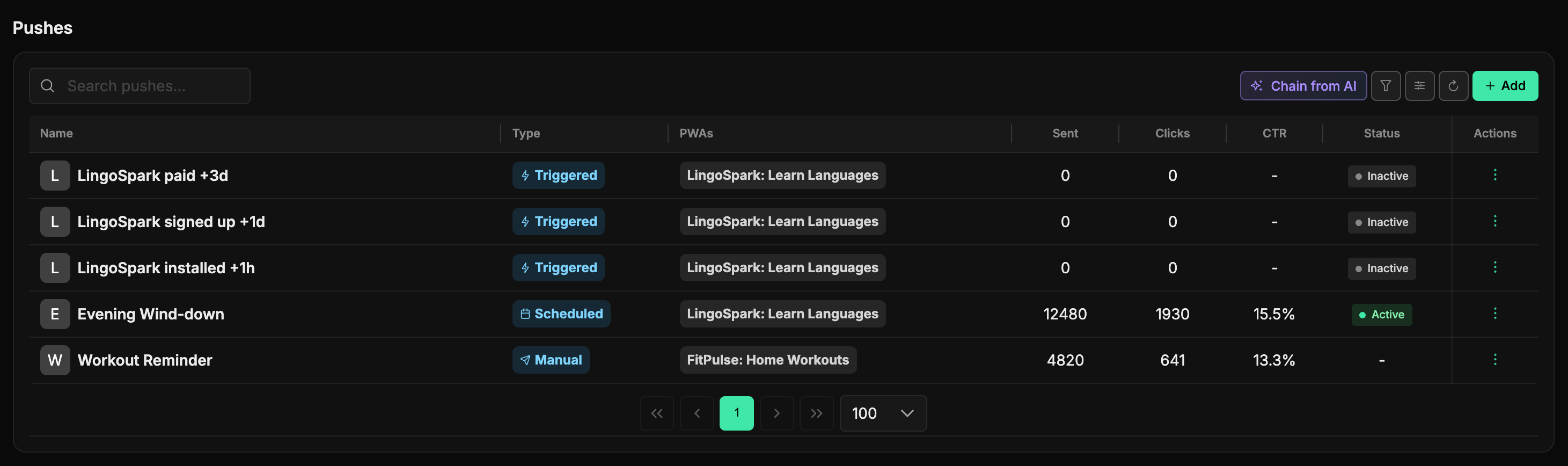
The section's main screen is a table of pushes. It shows what is running, who it reaches and how well it works:
- Name - the push's name.
- Type - how it fires: Manual, Scheduled or Triggered.
- PWAs - the apps whose subscribers receive the push. An All tag means it covers every PWA of the team.
- Sent - how many messages went out, Clicks - how many times they were tapped, CTR - clicks over sends as a percentage. This is the number that matters: it tells you at a glance which copy lands and which does not.
- Status - the badge is clickable: a tap starts or stops the push without opening it. Manual pushes show "-" instead: their status changes nothing, they go out on the button only.
Above the table are a search by name, the Add button (create a push) and a refresh button. The funnel button hides the filters: PWAs (pushes that target the selected app), Type, Status, Team and the Archived toggle. Next to it are the column settings; both work the same way in every list in the panel - see the "Interface" section.
What you can do with a row
The three-dot button on the right opens a menu:
- Start / Stop - turns automatic sending on or off (manual pushes have no such item).
- Send now - sends to the whole matching audience immediately, with a confirmation.
- Edit - opens the push form.
- Clone - creates a copy with all texts and settings. Handy when you need the same scenario for another geo or with different copy.
- Archive - removes the push from the list.
Chain from AI
The Chain from AI button above the list builds a ready reminder chain for one app: one push for every step of the subscriber funnel.
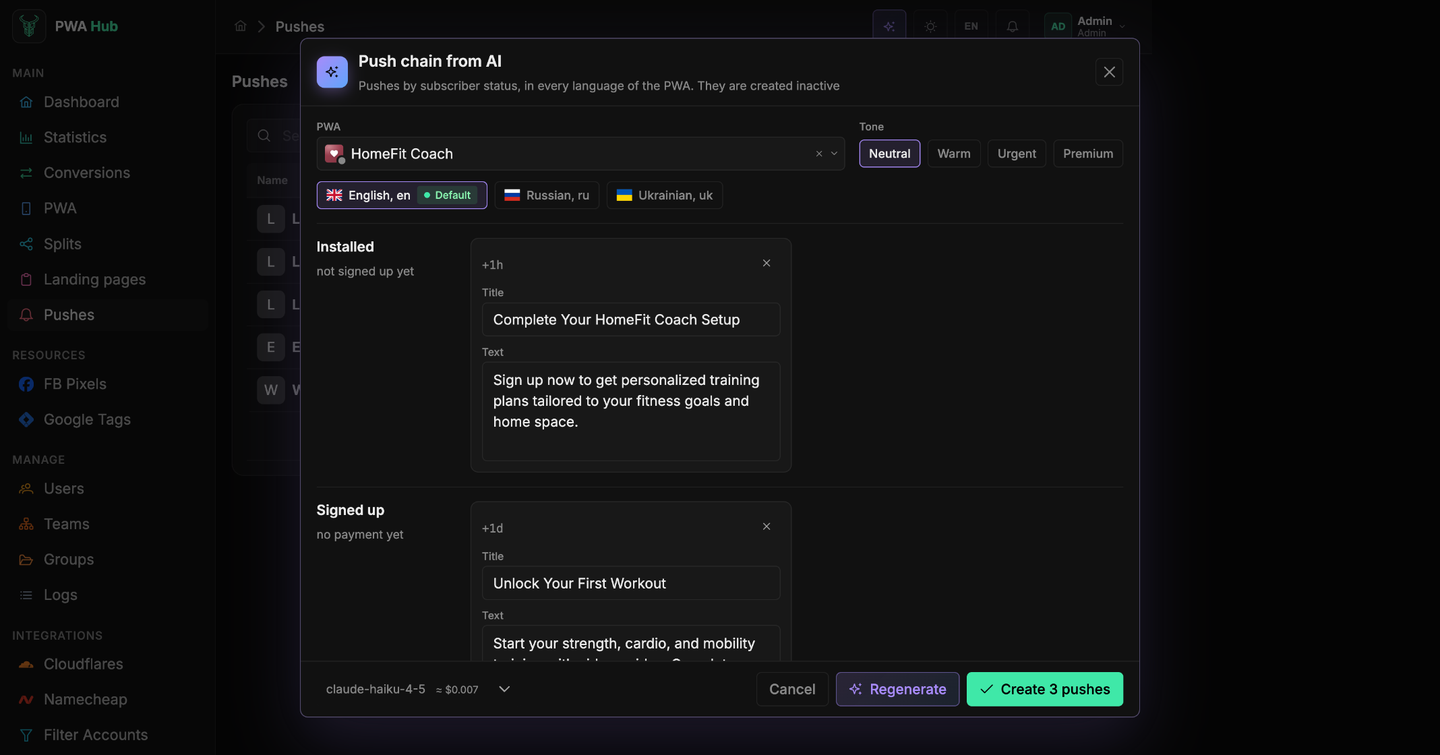
- Click Chain from AI and pick the PWA.
- Pick the tone: Neutral, Warm, Urgent or Premium.
- Click Generate. AI writes three pushes:
- Installed - an hour after install, for those who have not signed up yet;
- Signed up - a day after sign-up, for those who have not paid yet;
- Paid - three days after payment, to bring the user back.
- The texts are written in every language of the storefront. Switch the language with the chips above the drafts and edit the title and text right in the window. Remove a draft you do not need with the cross.
- Click Create N pushes. The pushes are created inactive: check them and turn them on yourself.
The overlaps tag on a draft means this PWA already has a push on the same step with the same delay. Regenerate writes a new version; the bottom of the window shows the approximate cost of the generation.
Creating a push
The Add button opens the form. It is split into four tabs: General, Messages, Schedule and Filter - general properties first, then copy, timing and audience.
You do not have to fill in everything at once: General and Messages are enough, and the schedule and filters can be adjusted later. The Create button saves the push; if something is wrong, the form opens the tab with the offending field for you.
In the header of an open push, next to Save:
- Start / Stop - turns automatic sends on or off (manual pushes have no such button);
- the eye button (Show as it arrives) - shows the push the way a subscriber will get it;
- the paper-plane button - Send now, see "Sending manually".
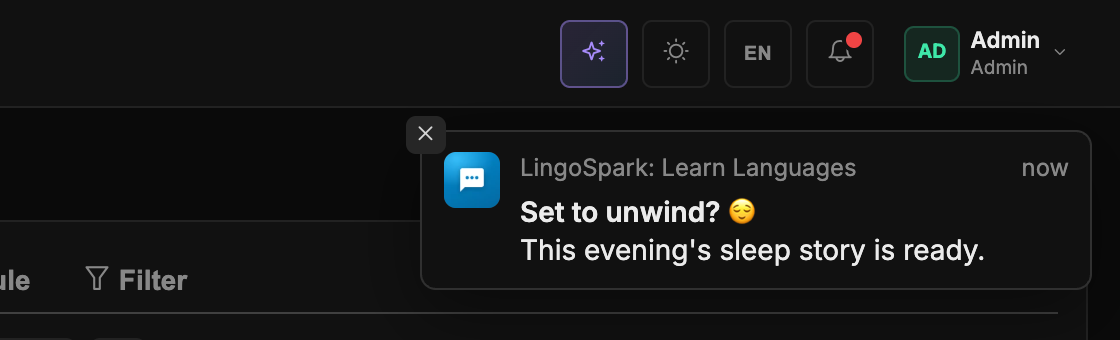
The eye button renders the copy in the default language and shows the card in the top-right corner for 6 seconds - the way a browser shows a notification. It works from any tab of the form and sends nothing. Hover over the card to hold it; a click or the cross closes it.
General - name, team, language and type
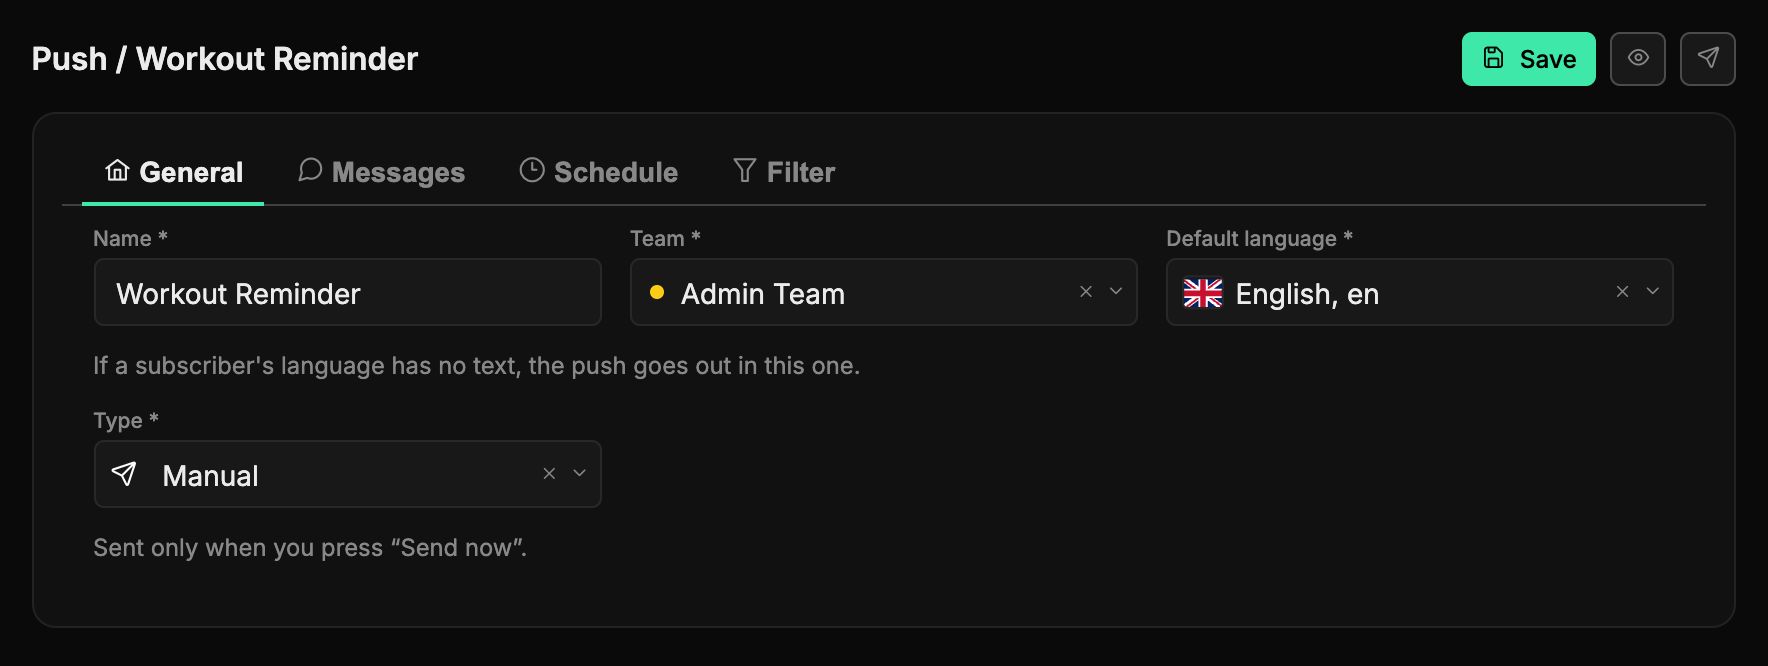
- Name - the name you will recognise the push by in the list.
- Team - the team the push belongs to. It also bounds the audience: a send never reaches beyond that team's subscribers.
- Default language - the language a message goes out in when there is no text for the subscriber's own.
- Type - how the push fires:
- Manual - on the Send now button only. One-off promos: a sale, a special offer, "two for the price of one today".
- Scheduled - on the weekdays and times set on the Schedule tab. Regular reminders: every evening, every weekend.
- Triggered - to each subscriber individually, a set time after their own install, registration or deposit. This is the autofunnel: someone installs the app and gets a welcome message two hours later, no matter when exactly they arrived.
The type is not final
A push's type is not a life sentence: stop it, switch the type and save. The schedule and the triggers are stored separately, so configured slots survive even if the push becomes manual for a while.
Messages - copy per language
The copy is stored per language: a subscriber gets the message in their language, and if there is none - in the language from the Default language field.
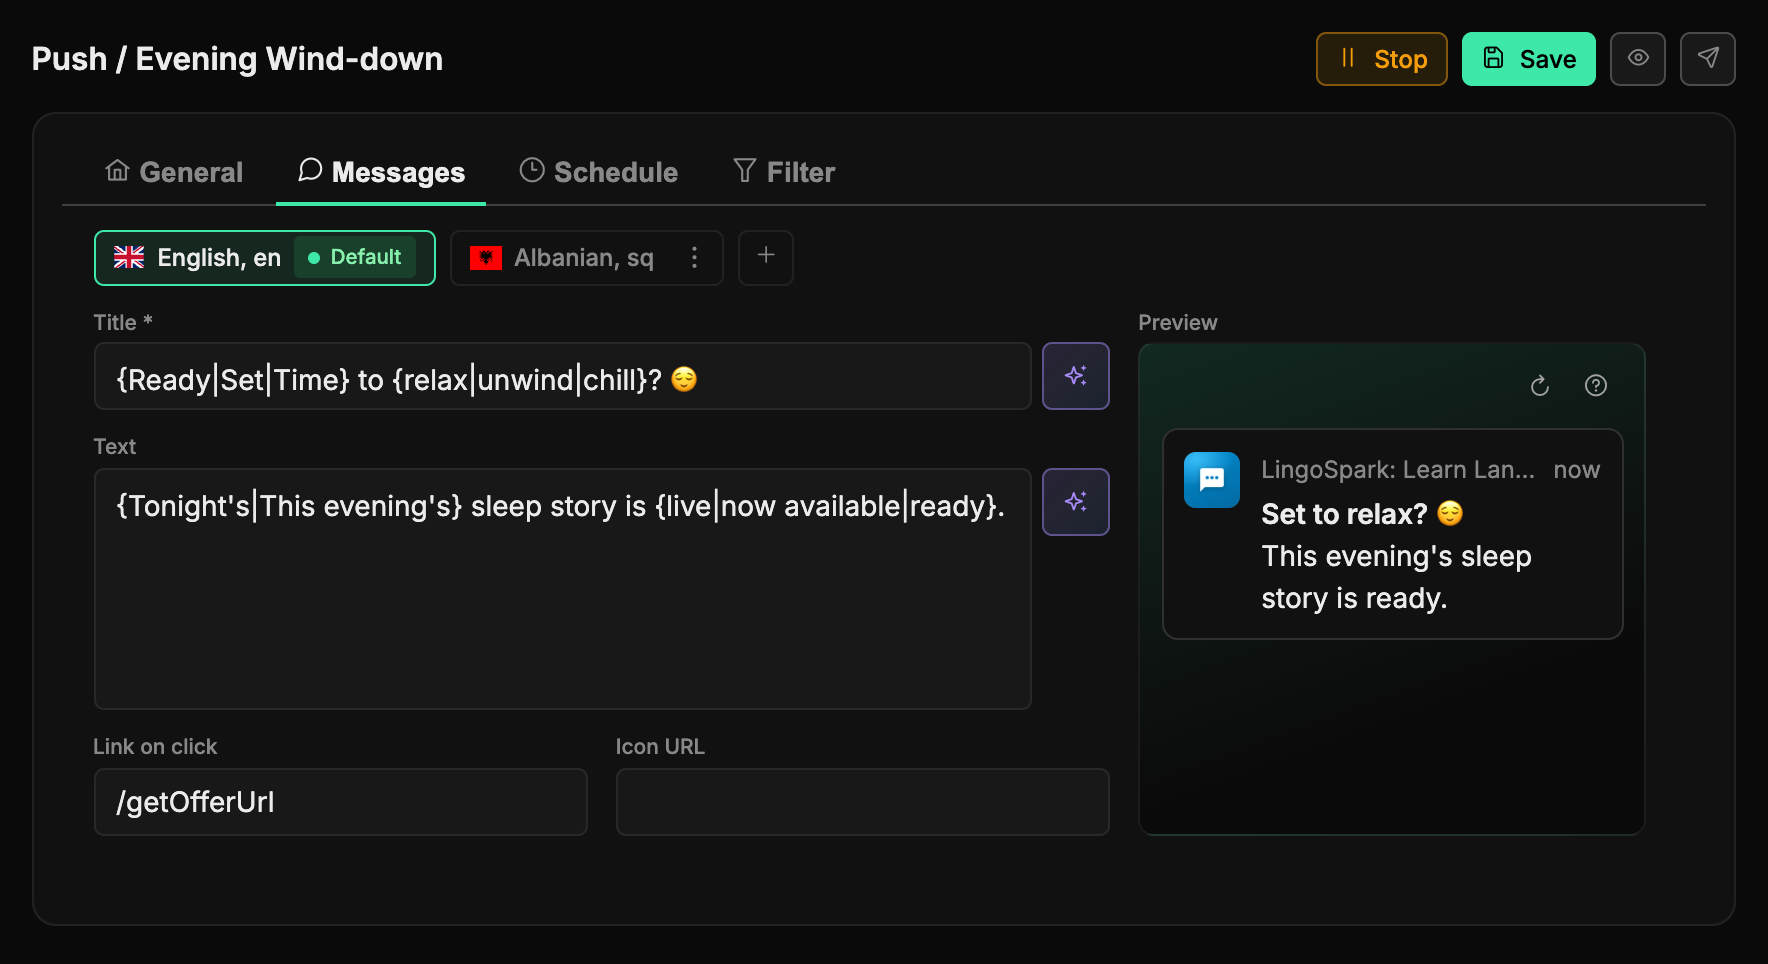
Languages are chips above the fields, as in the PWA form. You edit one language at a time: click a chip to open its copy. The default language is marked Default.
- Add a language - the plus button after the chips (Add language): pick a language in the window and click Add.
- Chip menu (three dots, on every language except the default one) - Make default makes the language the main one, Remove language deletes it together with its copy (the system asks for a confirmation).
- Translate with AI - on any language except the default one, a sparkle button appears after the chips (Translate from … with AI, where "…" is the default language code) if the default language has a title or text filled in. It translates them from the default language. Check and adjust the translation - it goes straight into the fields.
The fields of each language:
- Title - the notification title, up to 120 characters. Required.
- Text - the text under the title, up to 500 characters.
- Link on click - where a tap leads. Usually
/getOfferUrl- your offer link, the same one that opens when the app is launched. - Icon URL - your own notification image. Leave it empty and the app's own icon is used.
On the right is the Preview: how the notification looks on a phone screen. It updates by itself half a second after you stop typing and shows the push with the name of the first PWA from the Filter tab. Its icon is used only when Icon URL is empty. If no PWAs are selected in the filter, the card is labelled "PWA". If several PWAs are selected in the Filter, a hint under the card says that every other PWA sends it with its own name and icon.
If saving finds an error in some language, the form switches to that language for you.
Uniqueizing the copy
The same text sent to thousands of devices is both monotonous for people and a red flag for the browsers' push services. So the copy can be written as options: the system assembles a random combination from them separately for every recipient.
The operator reference opens with the question-mark button in the corner of the Preview:
| Syntax | What it does |
|---|---|
{a|b|c} | a random option; can be nested |
{%RINT=(N,M)} | a random integer from N to M |
{%R=(S) a|b|c} | shuffles the options and joins them with S |
{%Q=(N,S) a|b|c} | picks N random options and joins them with S |
For example, {Hey|Hi}! {%RINT=(10,50)}% off {your subscription|the plan|your first order} reaches everyone differently: "Hi! 25% off the plan", "Hey! 40% off your subscription" and so on.
The Preview always shows one such variant, and the arrow button in its corner (Another variant) renders the next one - press it a few times in a row to see the spread. The preview is built on the server, by the same code that sends the real thing, so there is no drift between them.
Let it write the options for you
The sparkle button next to a field (Uniqueize with AI) rewrites a finished sentence into such a template with options - all that is left is to check and tweak it. If no language model is connected on the server, the text stays as it was; this does not affect the push in any way - options can always be placed by hand.
Schedule - when to send
The tab shows the settings for the push type from the General tab only. A manual push has no schedule - it goes out with the Send now button; if no type is picked yet, the tab asks you to pick one first.
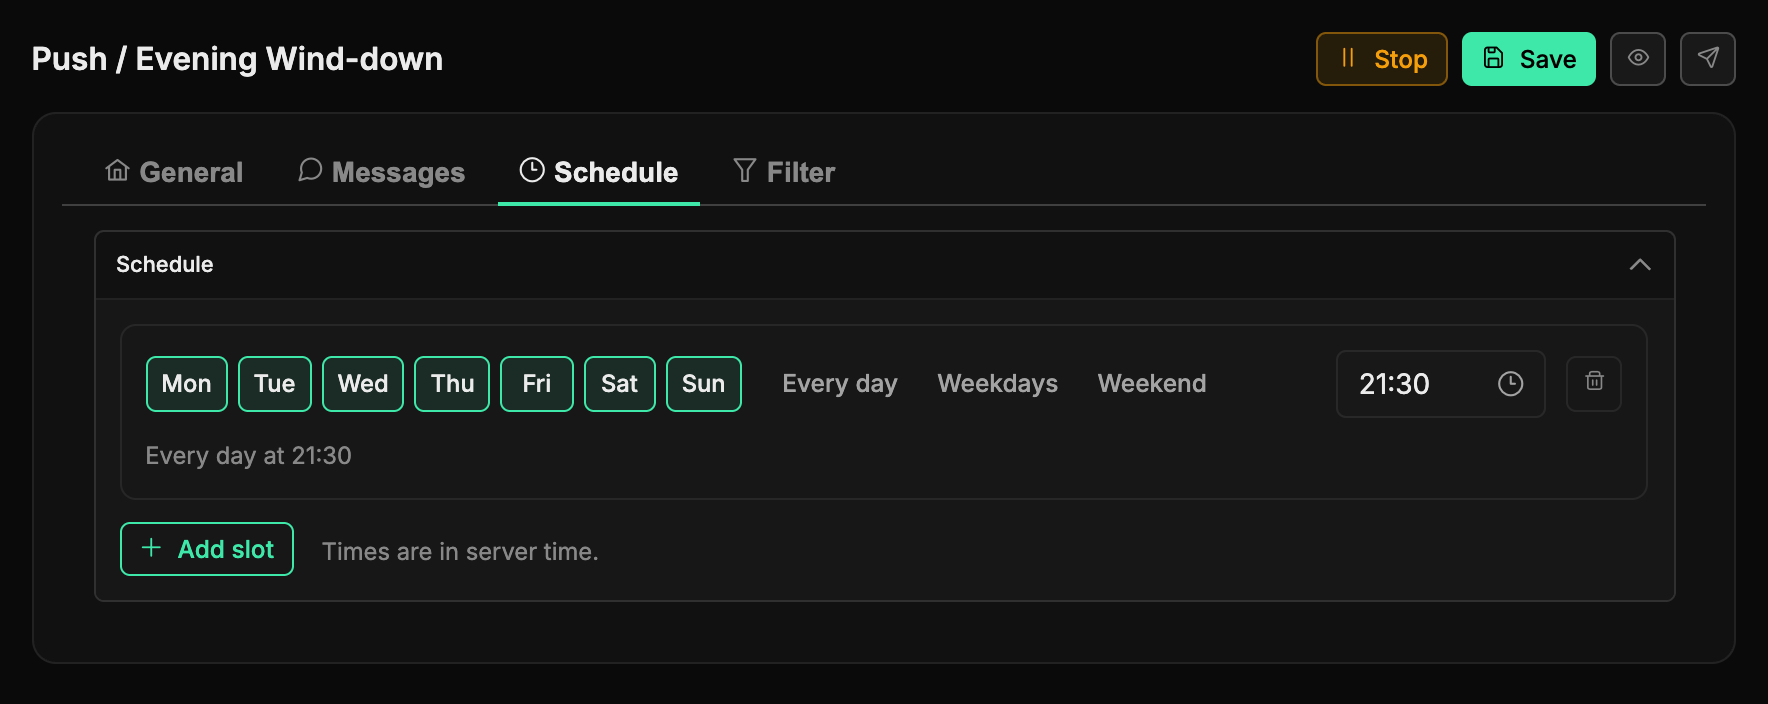
Scheduled - by weekday. Each row is a slot: mark the days with the Mon…Sun chips (or in one click - Every day, Weekdays, Weekend) and pick the time on the right. Under the chips the slot is spelled out in words, e.g. "Every day at 21:30". A slot without a single day won't save. Add slot adds another row - say, weekdays at 19:00 and weekends at 12:00; the bin on the right removes a slot.
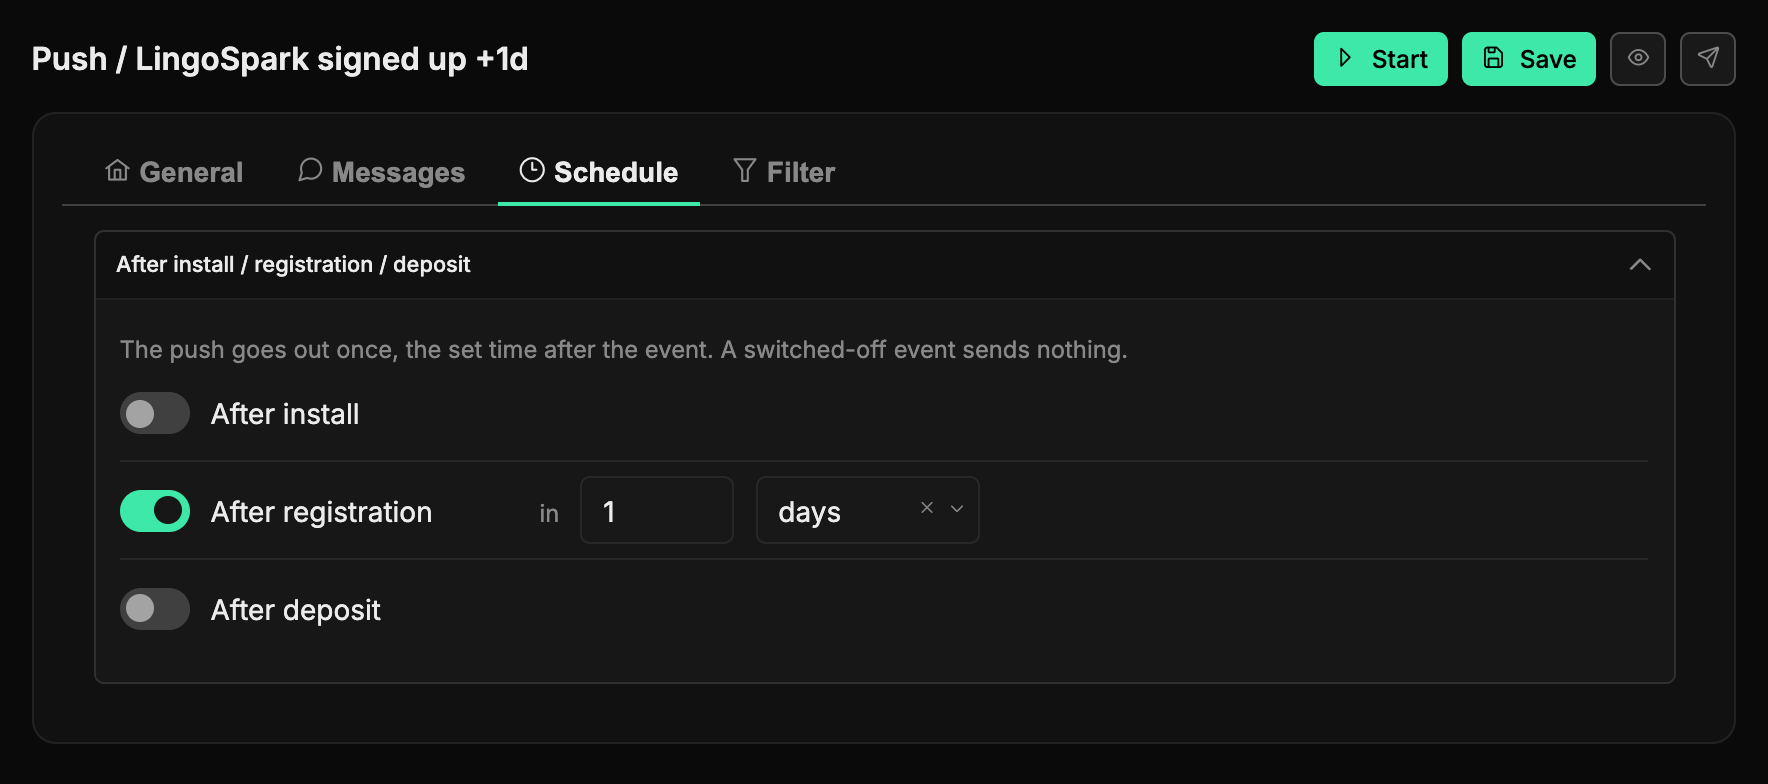
Triggered - after an event. Three rows: After install, After registration and After deposit. Switch on the event you need and set the delay as a number and a unit (min, hours or days). A switched-off event sends nothing. The push goes out once, the set time after the event, and the countdown runs for each subscriber from their own install, registration or deposit.
The clock is the server's
The schedule follows server time, not the recipient's time zone. If you run Brazil from a European server, account for the difference yourself: "evening local time" is a different number in the slot.
Filter - who receives it
By default a push covers all subscribers of its team. The filter is what narrows that circle.
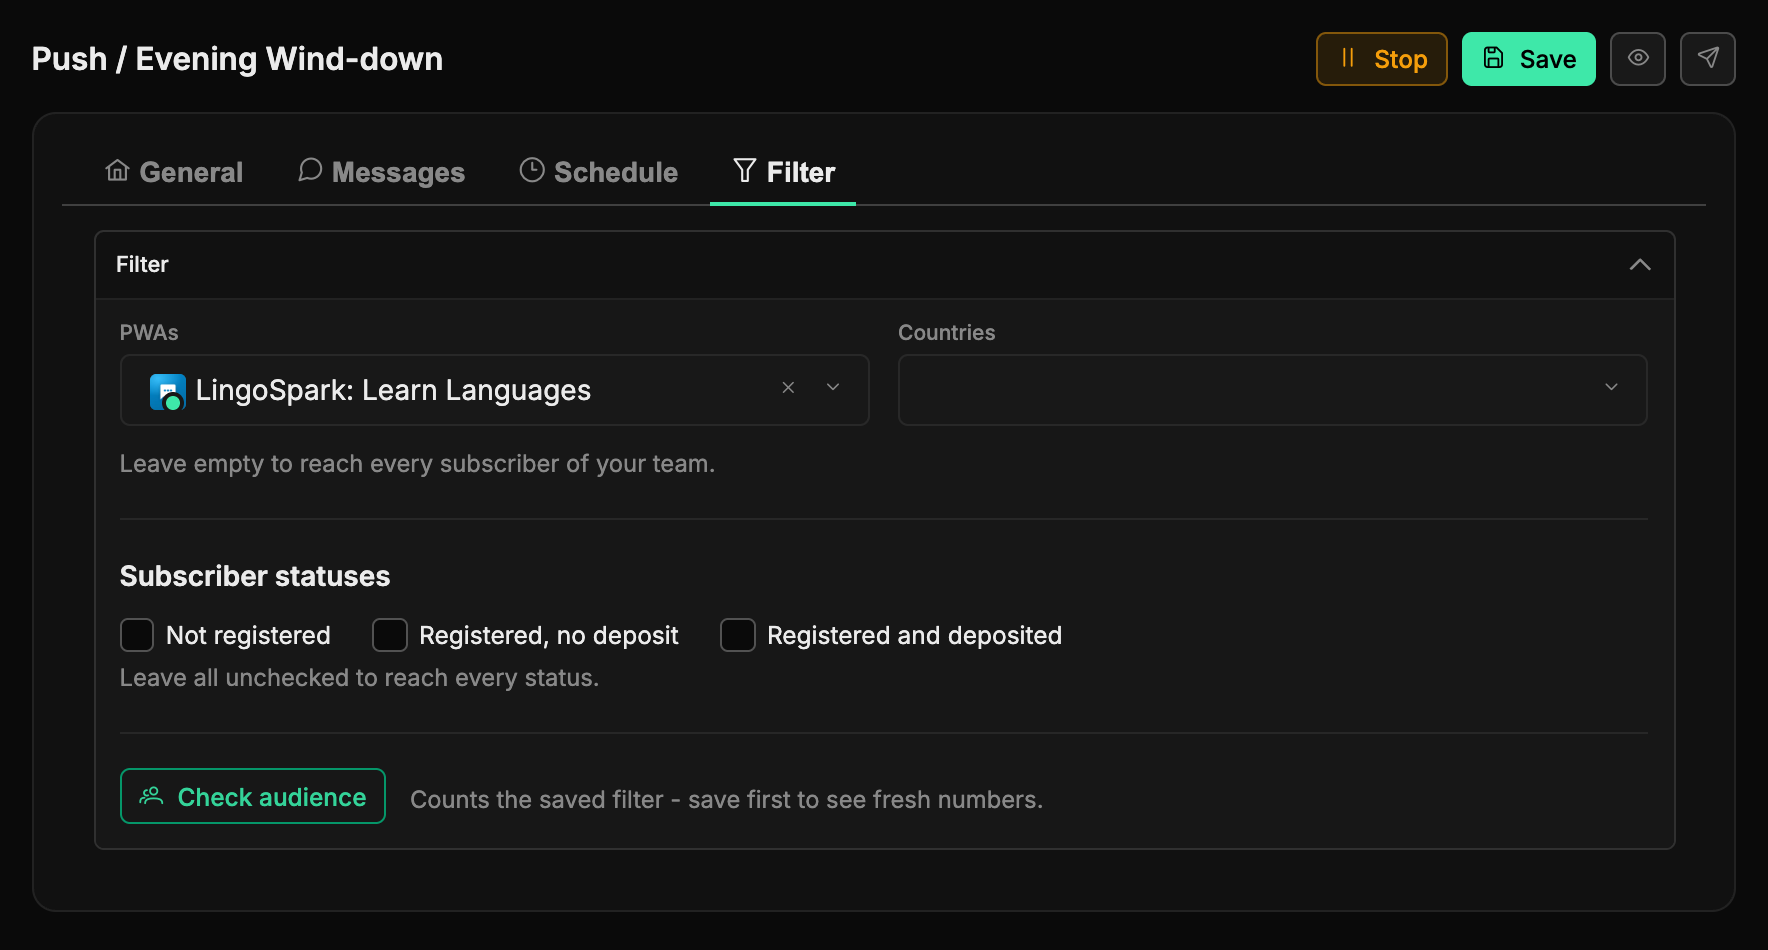
PWAs - specific apps. Empty means every app of the team.
Countries - subscriber countries. Empty means every country.
Subscriber statuses - the position in the funnel:
- Not registered - installed the app but never signed up;
- Registered, no deposit - signed up but never funded the account;
- Registered and deposited - already paying.
Nothing ticked means everyone is included.
The Check audience button shows how many subscribers currently match the filter. It counts the saved settings, so press Save first and check after.
Statuses are scenarios
Each status deserves its own copy. Those who never signed up need a reminder about the sign-up gift; the registered without a deposit need a first-purchase offer; payers want new features and personal discounts. One push for all of them loses to three separate ones almost every time.
Sending manually
The Send now button sits both in the row menu and in the header of an open push (the paper plane). It sends the message to the whole matching audience immediately, whatever the push's type and status. The system asks for a confirmation.
A send cannot be recalled
A delivered notification is already on the devices. Before you press, check the copy in the Preview or with the eye button, and the reach with Check audience on the Filter tab.
Regular (automatic) sends are never duplicated: a subscriber who already received the push through a trigger will not get it a second time. Send now, however, goes to everyone who matches the filter - even if they got the message before.
What happens after a send
- The Sent and Clicks counters in the list update as the send progresses, and CTR shows right away how well the copy worked.
- Devices that no longer accept messages (the app was uninstalled, the subscription revoked) are dropped automatically - the base cleans itself.
- Clicks are counted on the notification tap itself; an already-open app is not duplicated - the person lands in the window that is already running.
Why fewer were sent than there are subscribers
A message only goes out to those whose language has copy - the default language included. If a push has an English text only and Default language is not covered, subscribers with other languages are skipped. The easiest way to spot this is the gap between Check audience and Sent.
Where to start
The working minimum worth assembling on day one:
- Turn on Collect subscriptions in the PWA settings - the base starts growing right away.
- Create a Triggered push with a
2hdelay in After install and the Not registered status in the filter - a welcome message for those who have not reached registration yet. - Add a second one, Scheduled, for every evening - a regular reminder.
- A few days later compare the CTR of the two and rewrite the one that loses.
After that it is only about adding languages and refining segments - the subscriber base works for you with no extra traffic spend.
Pushes can also be created and sent from scripts - see the API section "Pushes".